Engine oil plays a vital role in keeping your vehicle running smoothly. It lubricates engine components, reduces friction, controls temperature, and prevents premature wear. Despite its importance, many vehicle owners ignore regular oil checks, which can lead to serious engine damage and expensive repairs. Learning how to check engine oil is a simple yet essential skill that every driver should know. This guide explains when, why, and how to check engine oil correctly, even if you are a beginner.
![How to Check Engine Oil Level & How Often [Step-by-Step]](https://media-blog.zutobi.com/wp-content/uploads/sites/2/2021/02/03120049/image-13.png?w=1920&auto=format&ixlib=next&fit=max)
Why Checking Engine Oil Is Important
Engine oil works continuously to protect moving parts inside the engine. Over time, oil levels can drop due to leakage, burning, or evaporation. Dirty or insufficient oil can cause increased friction, overheating, poor fuel efficiency, and long-term engine damage. Regular oil checks help you:
-
Detect oil leaks early
-
Maintain proper engine lubrication
-
Improve engine performance and fuel efficiency
-
Extend engine life
-
Avoid unexpected breakdowns
Checking engine oil takes only a few minutes and can save thousands in repair costs.
When Should You Check Engine Oil?
For most vehicles, it is recommended to check engine oil:
-
Once every two weeks
-
Before long trips
-
If the oil warning light turns on
-
After noticing unusual engine noise or overheating
Always check oil when the engine is cool or has been turned off for at least 10–15 minutes. This allows oil to settle back into the oil pan for an accurate reading.
Things You Need to Check Engine Oil
You don’t need special tools to check engine oil. Just keep the following ready:
-
A clean cloth or paper towel
-
Flat, well-lit parking surface
That’s it. The process is quick and simple.
Step-by-Step Guide to Checking Engine Oil

Step 1: Park on a Level Surface
Ensure your vehicle is parked on a flat surface. A sloped surface can give inaccurate oil level readings. Turn off the engine and engage the parking brake.
Step 2: Open the Hood
Locate the hood release lever inside the vehicle, usually near the driver’s seat. Pull it, then open the hood fully and secure it with the support rod if required.
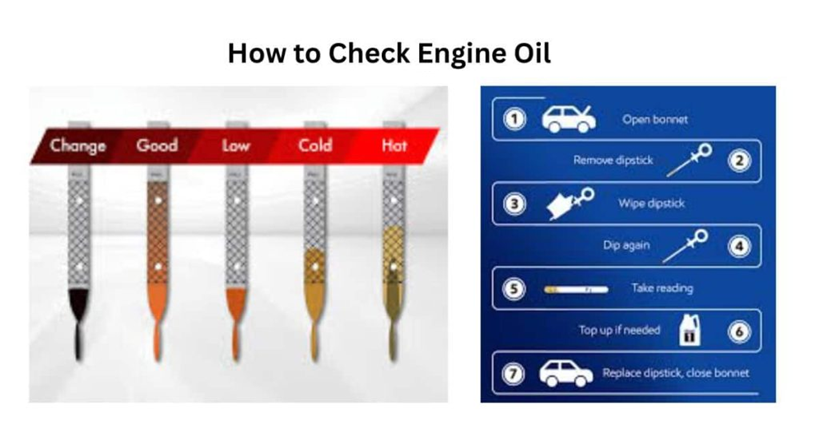
Step 3: Locate the Oil Dipstick
Find the oil dipstick inside the engine bay. It usually has a bright yellow, orange, or red handle marked with an oil symbol. Refer to your owner’s manual if you are unsure.
Step 4: Remove and Clean the Dipstick
Pull the dipstick out completely. Wipe it clean using a cloth or paper towel. This removes oil splashes that can cause false readings.
Step 5: Reinsert the Dipstick
Insert the dipstick fully back into its tube. Push it all the way down to ensure accuracy.
Step 6: Check the Oil Level
Pull the dipstick out again and observe the oil level. The dipstick has markings such as “MIN” and “MAX” or two dots/lines.
-
Oil level near MAX: Ideal
-
Oil level between MIN and MAX: Acceptable
-
Oil level below MIN: Oil needs to be added immediately
Never drive with oil below the minimum level.
How to Check Engine Oil Condition
Checking the oil level alone is not enough. You should also inspect the oil’s condition.
Oil Color
-
Light amber or golden: Clean and healthy oil
-
Dark brown or black: Normal for used oil, but may need changing
-
Milky or frothy: Possible coolant contamination (serious issue)
Oil Texture
Rub a small drop between your fingers:
-
Smooth texture: Normal
-
Gritty or thick: Indicates dirt or metal particles
If oil appears excessively dirty or contaminated, schedule an oil change immediately.
What to Do If Oil Level Is Low
If oil is below the recommended level:
-
Identify the correct engine oil grade from your owner’s manual
-
Locate the oil filler cap (usually marked with an oil symbol)
-
Add oil gradually using a funnel
-
Wait a minute and recheck the dipstick
-
Do not overfill — excess oil can damage engine seals
Always add oil in small amounts and recheck frequently.
Common Mistakes to Avoid
Many vehicle owners make simple mistakes when checking engine oil. Avoid these common errors:
-
Checking oil immediately after turning off the engine
-
Overfilling engine oil
-
Using the wrong oil grade
-
Ignoring oil warning lights
-
Forgetting to clean the dipstick before measuring
Correct habits ensure accurate readings and engine safety.
How Often Should You Change Engine Oil?
Checking oil is different from changing oil. While oil level should be checked regularly, oil changes depend on:
-
Vehicle type
-
Engine design
-
Driving conditions
-
Oil type used
Generally:
-
Conventional oil: Every 5,000–7,000 km
-
Synthetic oil: Every 8,000–12,000 km
Always follow manufacturer recommendations.
Benefits of Regular Engine Oil Checks
Regular engine oil inspection offers several long-term benefits:
-
Smoother engine operation
-
Reduced engine wear
-
Better fuel economy
-
Lower maintenance costs
-
Improved resale value
It also gives you peace of mind knowing your vehicle is well maintained.
Final Thoughts
Knowing how to check engine oil is a basic yet powerful skill that every driver should master. It requires minimal effort, no technical expertise, and only a few minutes of your time. Regular oil checks help prevent major mechanical problems, ensure optimal engine performance, and extend your vehicle’s lifespan.
Make engine oil inspection part of your routine vehicle care. A few minutes today can protect your engine for years to come.